Raspberry Pi monitor outputs remotely
This guide explains how you can monitor Raspberry Pi outputs like temperature, GPIOs, network usage and more easily and remotely using JFrog Connect platform.
Our goal is to monitor those outputs at any time automatically. In this guide, we will use python for programing, crontab for running the monitor script every minute and JFrog Connect IoT platform to receive the information from the Raspberry Pi. You can also use this guide to monitor other important parameters of your application as you wish!
STEP 1
Open account at JFrog Connect IoT device management platform – it is completely free for prototyping purposes.
STEP 2
Create a new project and connect your Raspberry Pis by copying & running the installation command from the ‘register device’ window in your device terminal. In a few seconds, you will see your Raspberry Pi under the ‘Devices’ category. Go ahead and change the device name and set the correct location (if you would like).
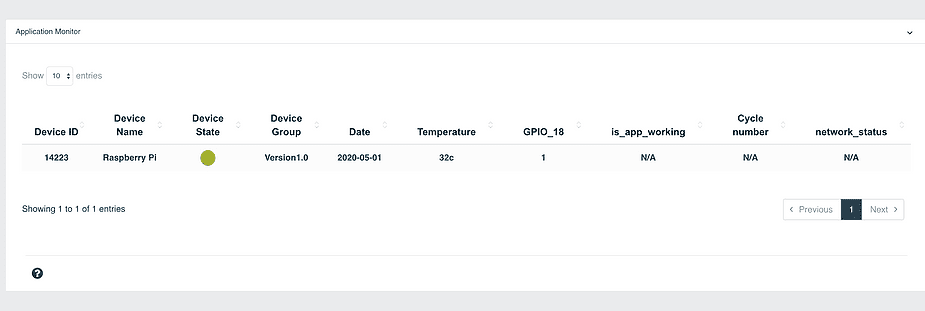
STEP 3
Go to ‘App Monitor’ category, here we can set the names of the parameters we would like to receive their values from the Raspberry Pi, it can be anything, for example- Pi_temperature, network_usage, is_app_in_work, is_screen_conncted, etc..
STEP 4
Let’s create a simple script that sends data from the Raspberry Pi to JFrog Connect App Monitor. To do so, we will use JFrog Connect General API.
Here are the basics of our python script design:
1. To send data to JFrog Connect platform, we need to pull JFrog Connect user_token & device_token from JFrog Connect settings file in ‘/etc/upswift/service/settings.json’.
2. Next, we want to have the relevant data ready to send. In this example, we would check the device temperature and GPIO status.
3. Send the data to JFrog Connect servers.
Here is the full python script of this example:
STEP 5
Run the script once and make sure you don’t get any error output.
Now, all we need to do is to run the script every minute, automatically.
Here is how we can do it:
1. run the command: crontab -e
2. If this is your first time here you will be asked to choose your favorite editor tool.
3. add a new line that includes the full path to your python script, here is how it should look like:
* * * * * python /home/my_script.py
The five asterisks mean means that your python script will run once in every minute.
Save the file and let’s leave the Raspberry to do the job!
STEP 6
Go to JFrog Connect App Monitor tool, in a few seconds, you will see a new line from your device, including the values you have just sent! congratulations!
JFrog Connect IoT platform by default monitors device resources like RAM, CPU, DISK, and current status, all available under the ‘Devices’ category. This guide works perfectly with any other embedded Linux based device and can help you monitor and manage thousands of edge devices all over the world in one place.


